
I have published many examples of Neural Nets in Maya using Python. Here is how to implement them in C++
In the past year, I have discussed many neural net types and their applications here in the blog. I have implemented simplified examples of most of them using the Maya Python API. But in the creation of production applications, deploying these solutions to C++ is essential for performance reasons.
In this article I discuss a reasonably simple solution for this in a Windows environment, using the ONNX file format as a means of saving and loading our models in a framework agnostic manner.
Disclaimer: I’m not super experienced in C++ and the Maya C++ API. If you lack C++ skills don’t feel discouraged, this is a super simple example! You might want to check out Raffaele Fragapane’s sensible introduction to compiling Maya C++ Plug-ins. I also assume you are comfortable at least with my tutorial on running neural nets from a Python DG node. Finally, I assume you are using Visual Studio 2017, and Maya 2018 update 5.
What you’ll learn
- Deploying trained neural nets to C++ and why ONNX
- Converting a Keras model to ONNX
- Compiling and loading a C++ Maya DG node
- Using CNTK and loading an ONNX file
You will need these resources to follow this tutorial
Deploying trained neural nets to C++ and why ONNX
I have a long history of writing code for discontinued platforms, including Softimage, Windows Phone, and Fabric Engine. There is one lesson I have learned from these experiences: target the most popular platform in your field, even if some niche platform looks more interesting.
So, my instinct for this article was to use Tensorflow. Tensorflow is the most popular ML framework nowadays, and it is actively maintained by Google; moreover, Tensorflow has a built-in Keras interface. Sadly, I found the deployment of trained Tensorflow models to C++ overly complicated, and the Windows support is lacking.
The easiest alternative on Windows is CNTK, which is native to the system [Windows 10]. CNTK is actively developed by Microsoft and can be trained using Keras. On the downside, it is not a popular platform, which makes me wary of its future.
ONNX, or Open Neural Network Exchange, is an open-source format developed by Microsoft, Amazon, and Facebook. This format allows one to store a trained model and run it anywhere. Many packages like Caffe2 (Facebook), PyTorch, MXNet (Apache), MATLAB, and CNTK support ONNX; also, tools are available to convert ONNX models to and from Apple ML, Keras, Tensorflow, Scikit-learn, and others. Finally, companies like Nvidia, Qualcomm, and Tencent seem to support the format.
So, even though I’m a bit skeptical of not using the most popular solution in the field, I feel like ONNX has significant traction and probably should not go away in the short term.
In this tutorial we’ll convert a Keras model to ONNX and load the ONNX models using Windows’s CNTK library, then we output results to a C++ Maya DG Node.
Converting a Keras model to ONNX
To turn your Keras models into ONNX models, you’ll need the onnxmltools package. Sadly ‘onnxmltools’ is only available for Python 3. So, my recommendation is that you install these dependencies:
- Python 3.6
- Jupyter Notebook
- Some Keras backend (CNTK, Tensorflow, or Theano)
- Keras
- Scikit-learn
- and, finally, onnxmltools
I do recommend you use Anaconda (or better yet miniconda), which is a way to have many different Python installations smartly organized in your computer. You install Anaconda using a GUI and operate it through a prompt using no more than a handful of commands.
Once you’ve installed all dependencies, you are ready to train the model and save it to ONNX.
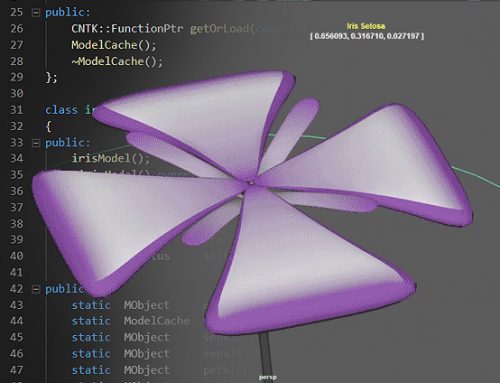
I’ll be using the model I’ve trained in my first tutorial on how to use Neural Nets inside Maya. You can download the Jupyter Notebook to train the model in the resources for this article.
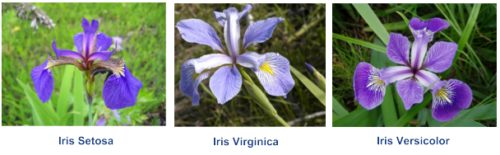
The model uses the Iris dataset, to infer one of three types of flowers based on the size of sepals and petals.
After training the model, we export it to ONNX using the following lines of code:
import onnxmltools
onnx_model = onnxmltools.convert_keras(model, target_opset=7)
onnxmltools.utils.save_model(onnx_model, 'irisModel.onnx')
Now you should have a .onnx file which you can load from your C++ code. Note that target_opset refers to the version of ONNX we are targeting. Opset 7 = version 1.2.
Compiling and loading a C++ DG Node
Before loading your ONNX model, you’ll need to create a Maya DG Node you can load it in. Since Maya’s Python API is a wrapping of its C++ API, this is very similar to what we have previously done in the tutorial on running neural nets from a Python DG node. With the added complexities of compiling a Maya plugin, many of which have been addressed by Raffaele Fragapane’s video series. Please review these materials if you feel like you are missing something.
Compiling your node
I provide you with the code for two different DG nodes in the resources section. One is an empty node template, and the other is the final code. You’ll notice from the empty node that a C++ DG Node has the same structure than a Python DG Node:
#include <maya/MPxNode.h>
#include <maya/MFnPlugin.h>
#include <maya/MPlug.h>
#include <maya/MDataBlock.h>
#include <maya/MDataHandle.h>

// (1)
class emptyNode: public MPxNode { … };

// (2)
MTypeId emptyNode::id(0x80014);
emptyNode::emptyNode() {}
emptyNode::~emptyNode() {}

// (3)
MStatus emptyNode::compute(const MPlug& plug, MDataBlock& data) { … }

void* emptyNode::creator() { … }

// (4)
MStatus emptyNode::initialize() { … }

// (5)
MStatus initializePlugin(MObject obj) { … }

MStatus uninitializePlugin(MObject obj { … }
We create a new class inheriting from the MPxNode class (1), then we give it a unique ID (2). In the compute function (3) we load the data we need from the data block, perform the computations, store the data back in the data block, and update the node’s dirty status. In the initialize function (4) we create attributes and declare their dependencies. Finally, we provide Maya with the entry points for its plug-in system in the initialize and uninitialized functions (5).
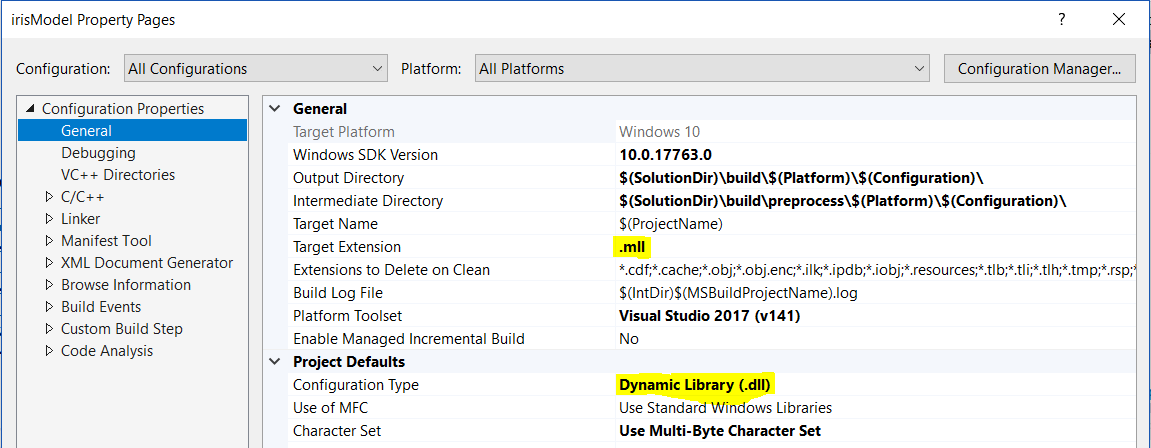
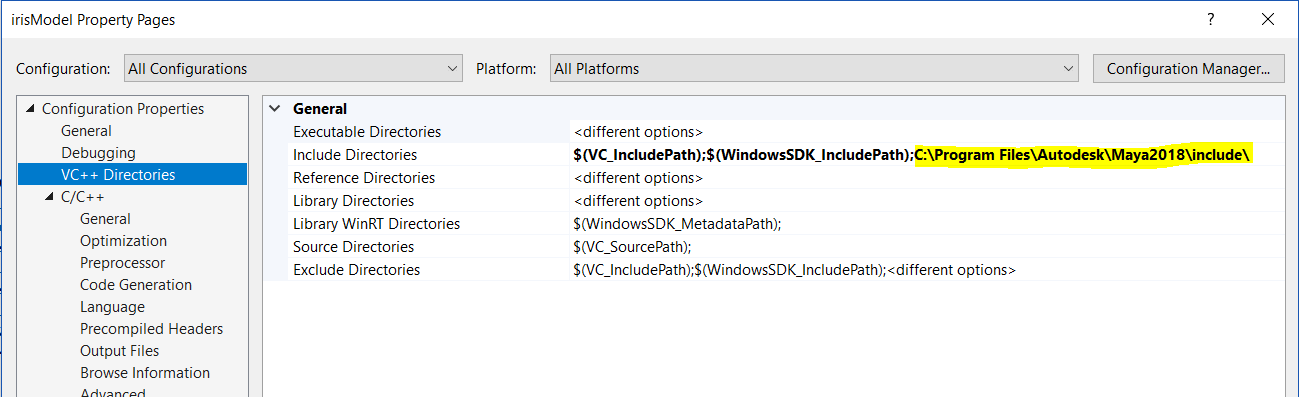
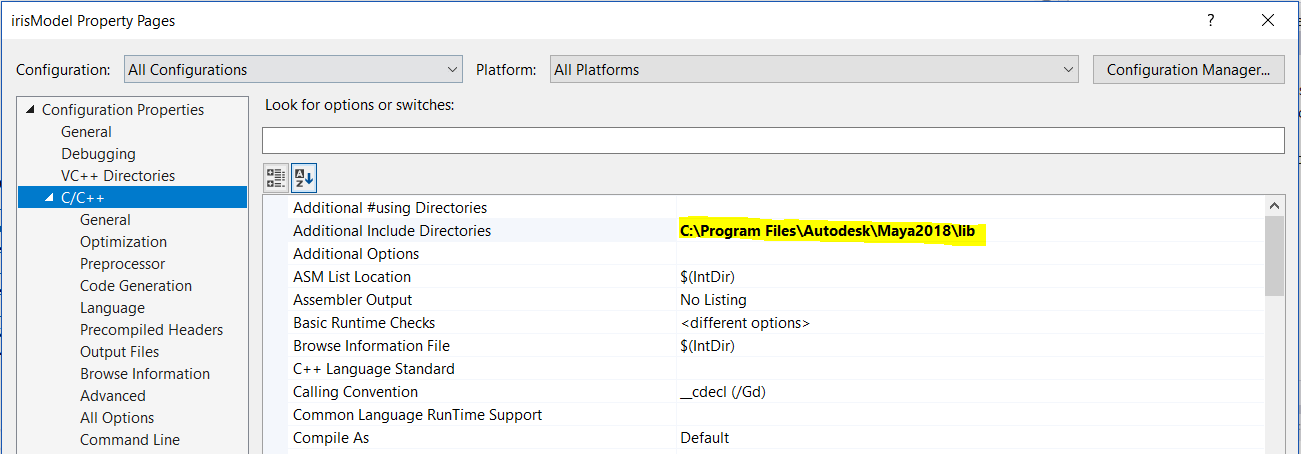
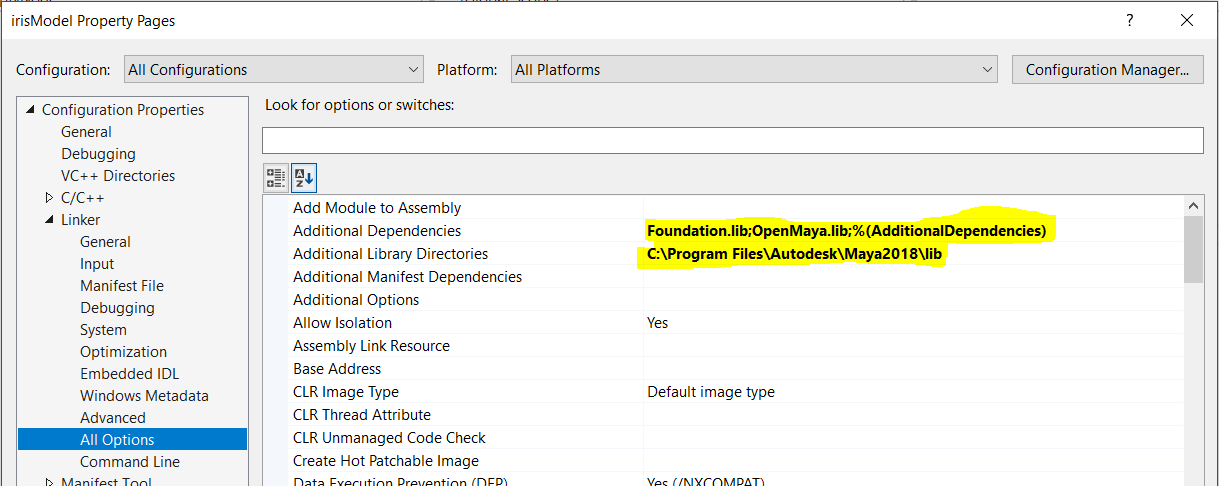
To correctly compile your plug-in remember to adjust this settings in your Visual Studio project: (1) Set project type to DLL and output file to .mll (because of Maya); (2) Add C:\Program Files\Autodesk\Maya2018\include\ to the include directories in VC++ Directories; (3) Add C:\Program Files\Autodesk\Maya2018\lib to your additional include directories; (4) In the linker properties add ‘Foundation.lib’ and ‘OpenMaya.lib’ to Additional Dependencies, and the C:\Program Files\Autodesk\Maya2018\lib path to Additional Library Directories. See the following images for reference:
Once this you have done this, you can build your project to generate the .mll file that you can then load inside Maya.
Loading your node
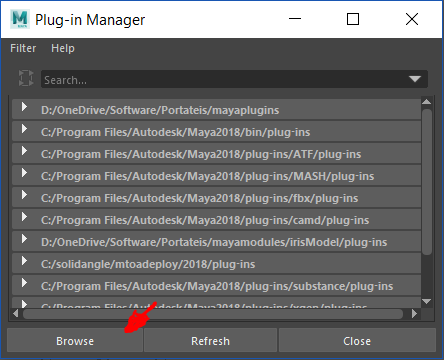
One way to install your compiled node is to use the browse button in the Plug-in Manager.
This path is ok if your plugin is one single file [like our emptyNode]. But since our plugin has many files (our .mll plus DLLs from the CNTK library), it is best to load it as a Maya module.
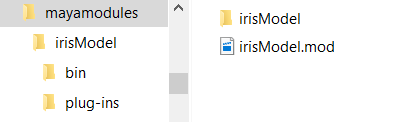
So, I suggest you create a directory for all Maya modules you’ll be building if you don’t have one already. In it, you’ll create: (1) a folder for the Iris Model module, (2) a .mod file declaring the content of the Iris Model folder. Here is how your files and folder structure should look like:
And your irisModel.mod file should read like this:
+ irisModel 1.0 ./irisModel/
MOD_PLUG_IN_PATH+:=plug-ins
PATH+:=bin
This code tells Maya irisModel v1.0 lives at root/irisModule; Maya plug-in files will are stored in the plug-ins folder, and binary dependencies (in our case the CNTK DLLs) are stored in the bin folder.
Finally, we need to make Maya look for our ‘mayamodules’ folder on startup. For that edit your Maya.env file (Users/Documents/Maya/2018/) adding this line to it:
MAYA_MODULE_PATH=C:\PathTo\mayamodules
Phew. That should do it. Copy the .mll file you have compiled to the ‘plug-ins’ folder you have created. Your empty C++ DG node should work fine when you load it through the Plug-in Manager window.
Using CNTK and loading an ONNX file
Ok. Now we need to fill our DG node with the important stuff. You’ll have to create the same attributes we have created in the Python DG tutorial. Since this is very similar, I won’t repeat myself. You can find the final code in the resources.
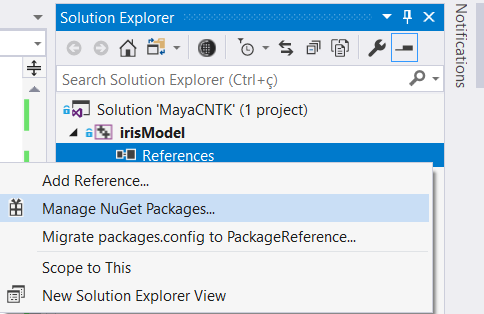
Then we’ll need to get the values from the data block and feed it to our model. To load the ONNX model, we’ll use the CNTK library. You can install it using the NuGet package manager inside Visual Studio. Rick click the References in your project and start NuGet, like so:
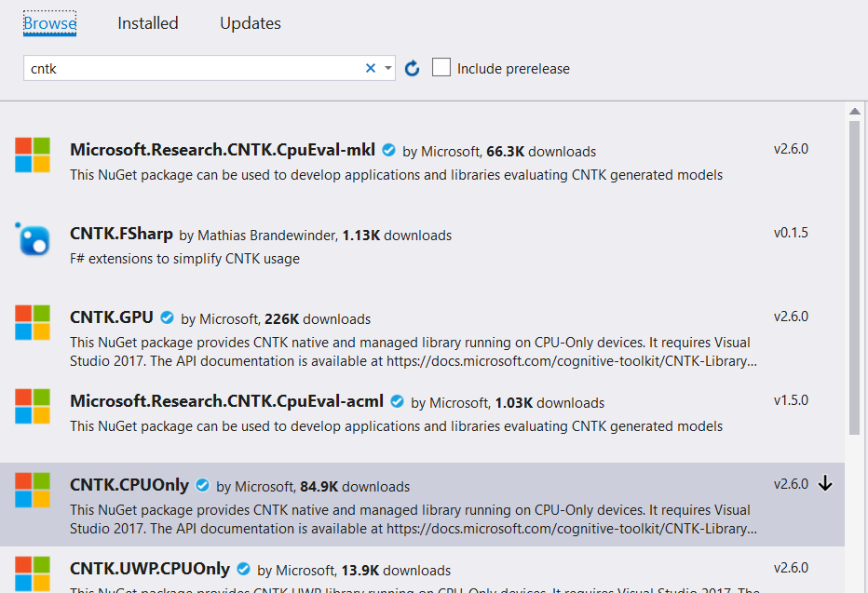
Search for CNTK. For simplicity I suggest you install the CPU-only version:
Once you have CNTK installed here is what you’ll need to do to load your model and get predictions from it:
#include "CNTKLibrary.h"

[…]

// (1)
const CNTK::DeviceDescriptor device = CNTK::DeviceDescriptor::CPUDevice();
modelPtr = CNTK::Function::Load(“c:/filePath/model.onnx”, device, CNTK::ModelFormat::ONNX);

// (2)
CNTK::Variable inputVar = modelFunc->Arguments()[0];
CNTK::Variable outputVar = modelFunc->Output();

// (3)
CNTK::ValuePtr inputVal = CNTK::Value::CreateBatch(inputVar.Shape(), inputData, device);
std::unordered_map<CNTK::Variable, CNTK::ValuePtr> inputDataMap = { { inputVar, inputVal } };

// (4)
std::unordered_map<CNTK::Variable, CNTK::ValuePtr> outputDataMap = { { outputVar, nullptr } };

// (5)
modelFunc->Evaluate(inputDataMap, outputDataMap, device);

// (6)
CNTK::ValuePtr outputVal = outputDataMap[outputVar];
std::vector<std::vector<float>> outputData;
outputVal->CopyVariableValueTo(outputVar, outputData);
Here is what is going on:
- We define the hardware and get a pointer to the loaded model.
- Then we create variables for the inputs and outputs of the model.
- We create a mapping to pass our inputs to the model’s input variable.
- Then we create a mapping to the output variable using a null pointer to indicate the use of system allocated memory.
- Now we perform the actual prediction [evaluation in CNTK’s terms].
- And, finally, we get the output variable and cast its data to a vector of vectors (or matrix, or bi-dimensional array, or list of lists, or however else you want to call it).
In the final code, available in the resources, you’ll notice we have created a model cache class, so we don’t need to load the model at every new evaluation; we also make the model path variable, using an MPxNode attribute.
Finally, we create two strings to properly display the name of the predicted flower and the predicted probabilities.
std::string win_str_result;
std::string prob_str_result;

// get position of max element
auto result_int = std::distance(outputData[0].begin(), std::max_element(outputData[0].begin(), outputData[0].end()));

switch (result_int) {
    case 0: { win_str_result = "Iris Setosa"; break; }
    case 1: { win_str_result = "Iris Virginica"; break; }
    case 2: { win_str_result = "Iris Versicolor"; break; }
}

auto probabilities = outputData[0];
prob_str_result = "[ " + std::to_string(probabilities[0]) + ", "
                       + std::to_string(probabilities[1]) + ", "
                       + std::to_string(probabilities[2]) + " ]";
Compiling and loading
After compiling your code, you’ll see many files in your Release folder. Copy your irisModel.mll file to the ‘plug-ins’ folder we have previously created. Copy all other .dll files to the ‘bin’ folder we have previously created. These DLLs are from the CNTK we are using.
If everything is set up correctly you can load the Maya sample scene found in the resources; it should look like this:
In Conclusion
In this article, you have learned one path to deploying Neural Networks to Maya using the C++ API. This is an important component in the deployment of more production like solutions. The solution described in this article is relatively easy to implement and is highly compatible with many popular frameworks and platforms.
I hope this will enable you in taking your projects to the next level!
Hi, loving this site!! Unfortunately resources seem to be missing from all articles. Cheers
Üniversiteler arası düzenlenen beer pong turnasını 3 yıldır Raz-r grubu kazanmaktadır.Andy ( Preston Jones ) ve arkadaşları bu turnuvaya katılıp şampiyon olabilmek için hazırlanmaktadırlar.Bu arada Andy’nin kız arkadaşı Katy ( Julianna Guill ) süpriz bir şekilde CSM üniversitesinden kaydını aldırıp habersiz şekilde Andy’nin okudugu üniversiteye geçiş yapmıştırır ve ansızın karşısına çıkar.Bu duruma hem sevinen hemde şaşıran Any’nin kafası karışır.Turnuvanın başlamasına az bir zaman kala Andy’nin ilk aşkı Jenna ile ilginç bir şekilde yolları yeniden kesişince Andy tunuvaya katılmadan önce arkadaşları ile birlikte Jenna’nın yanına ugramaya karar verir ama bu yolculuk göründügü kadar kolay olmucak , bela peşlerini bırakmıcaktır. Dorsey Samyn