
In this article, you will learn how to train a Neural Network. Then you will learn how to use that network inside Maya to classify elements of your scene.
If you want to know what are Neural Networks, how they work and why they are particularly useful, check out this other article.
What you will learn in this article
How to train a simple Neural Network for pattern recognition inside the Keras framework
How to run the Keras framework inside Maya
How to feed Maya scene to your Neural Network and get predictions
You will need these resources to follow this tutorial
How to train a simple Neural Network in Keras
Keras is a Python interface for training Neural Networks using other frameworks as backends. Keras doesn’t train the networks itself but instead lets you define your models with a simple syntax an then translates those instructions into your framework of choice. There are a few reasons I chose Keras for this tutorial:
- It works in Python 2.7
- The syntax is simple and intuitive
- It can use different ‘engines’ (backends) and provide consistent results
In Maya, we are stuck with Python 2.7. So, we cannot run the coolest frameworks in town (Pytorch and Tensorflow), but Keras let us define our model in an agnostic way, and we can then use the best engine for whatever developing environment we find ourselves in.
To train our network we don’t need to be in Maya specifically, so I am going to recommend you train your network using Google Collaboratory.
IPython Notebooks and Google Collaboratory
Google Collaboratory is a service that runs Python code online; it supports rich markups that make it very easy to follow, read, and experiment (this is inspired in IPython/Jupyter Notebooks if you don’t know what these are you should check this out). You can download the notebook for this tutorial in the resources section, but I will go through the code here.
The first step in our code is to load all the Python packages we need:
# Load everything we need
import keras                             # Our framework of choice. In Google Collab. Keras runs using Tensorflow as a backend
from keras.models import Sequential      # An object we need to define our model
from keras.layers import Dense           # This is the type of network
from keras import utils                  # Tools to process our data
import numpy as np                       # Types for structuring our data
from sklearn import datasets             # A library of interesting ML datasets

# Additionally, we set Numpy to show numbers without scientific notation that can be hard to read
np.set_printoptions(suppress=True)
Some thoughts about the previous code snippet. You should know that most Machine Learning frameworks express the inputs and outputs to their models as Numpy’s NDArray type. ND stands for N-Dimensional, that is, an array of any dimensions you want it to be. You’ll see that in this tutorial our problem has 4 input features and 3 output features, and our dataset has 150 samples of information. Therefore our NDArrays will be of sizes 150,4 (input) and 150,3 (output).
Another thing to notice is models can be defined in Keras using the Sequential API or the Functional API. We will use Sequential for the time being, for it is simpler to grasp.
Loading and Pre-Processing the Iris Dataset
Now we will load our dataset. Most of the times you will store datasets in CSV files and manipulate them accordingly to fit an NDArray. For this tutorial, we will load a dataset from the Sklearn package.
irisData = datasets.load_iris()
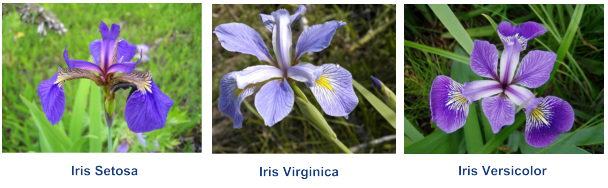
The Iris dataset (Fischer, 1936) is one of the best-known sample datasets for pattern recognition. According to the UCI ML Repo (https://archive.ics.uci.edu/ml/datasets/iris): “The dataset contains 3 classes of 50 instances each, where each class refers to a type of iris plant. One class is linearly separable from the other 2; the latter are NOT linearly separable from each other.” These is what the plants look like in real life:
The dataset contains 5 plant’s attributes:
- sepal length in cm
- sepal width in cm
- petal length in cm
- petal width in cm
- class
We will use the first 4 features (inputs) to predict the class of the plant (output). Our dataset is partially pre-processed, and you can see the inputs and targets running the following lines in your notebook:
irisData.data
irisData.target
You will notice that the target classes are integers (0, 1, 2). But that formatting would lead the Neural Network to infer order from the classes, which would not be true. So we have to convert the target formatting to something known as One-Hot Encoding. In this encoding the first category will be represented as a vector [1, 0, 0], the second will be vector [0, 1, 0], and so on. Doing that is this simple:
inputs = irisData.data
targets = irisData.target
targetsVec = utils.to_categorical(targets)
Finally, when we train our model part of the samples will be used for learning, and the other part will be used to test the accuracy of the model. Therefore, we need to shuffle our dataset, so all categories are evenly represented in both training and test sets.
randIds = range(0,150)
np.random.shuffle(randIds)
randInputs = np.ndarray(shape=(150,4), dtype=float)
randTargets = np.ndarray(shape=(150,3), dtype=float)
i = 0
for j in randIds:
  randInputs[i] = (inputs[j])
  randTargets[i] = (targetsVec[j])
  i += 1
Our first pattern recognition Neural Network
Keras Sequential API makes defining Neural Nets easy. We will define our network with three lines of code:
model = Sequential()                                       # We use Keras' Sequential API
model.add(Dense(20, input_dim=4, activation='sigmoid'))    # Add a hidden dense layer with 20 neurons and sig. activation
model.add(Dense(3, activation='softmax'))                  # Add 3 outputs (one per class) with softmax activation
Don’t worry if you have not yet read our article on how a Neural Networks work. For now, all you need to know is that we will use our model to find the correlation between the petal and sepal data and the classes of the plants. The hidden layer can be understood as a set of ‘filters’ (20 filters for that matter) that will find different correlations between the four input features. The output layer will sort out the pattern that exists between the activation of such filters and the annotated categories. The layers are said to be dense because, in each layer, all inputs affect all outputs.
You might be curious about the topology we have just built. This is what it looks like:

Now we have to actually train our model, so it learns the patterns in the data. First, we set the learning parameters using these two lines:
adam = keras.optimizers.Adam(lr=0.05)
model.compile(loss='binary_crossentropy', optimizer=adam, metrics=['accuracy'])
Here we are telling Keras what should be the optimizer (Adam) and the learning rate (lr). We will talk about both of these in a future article. The loss function is the method Keras will use to determine how far, and in which direction, the model is from the correct answer so it knows how to ‘learn’. The accuracy metric will help us determine how well our model is performing on the test set.
Now we train our network:
model.fit(randInputs, randTargets, epochs=10, validation_split=0.3, batch_size=None)
Notice the parameter validation_split (at 0.3). That means 30% of all our samples will be used for testing accuracy only, while the other 70% will be actually used to train the network. We do this to avoid a problem called overfitting, that we will talk about in a future article (feel free to Google it).
After the 10 training epochs, you should have an accuracy of +95%. Notice that Neural Networks are have randomly initiated weights, so every time you run this notebook, you will get slightly different results.
Exporting your model
Saving a Neural Network in Keras is as easy as:
model.save('iris.h5')
You can then download the file using these two lines:
from google.colab import files
files.download( 'iris.h5' )
How to run Keras inside Maya
Running Keras inside Maya is not as easy as it could be. You might know different package managers that make the installation of Python packages as easy as ‘pip install keras’ or ‘conda install -c conda-forge keras’. These will not work in Maya.
A few words about Maya, Python and binary compatibility
Maya has its own Python interpreter (aka. Mayapy.exe) that is not binary compatible with many Python libraries. We have a detailed post about binary compatibility here.
For now, all you need to know is that some Python libraries we’ll use are not compatible with Maya. These are: Numpy, Sciy, and H5py. You can download the Maya 2018 compatible versions of these with the resources for this article.
Installing Keras backend and other dependencies
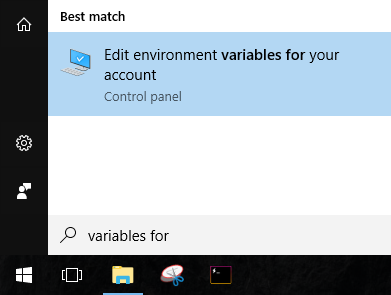
Before installing Keras and its dependencies we highly recommend that you add ‘mayapy.exe’ to your environments Path Variable. This is so you can easily access mayapy from any prompt without the need for typing the whole path for mayapy (c:\program files\etc…). Just press the windows button and search for ‘Edit environment variables for your account’.
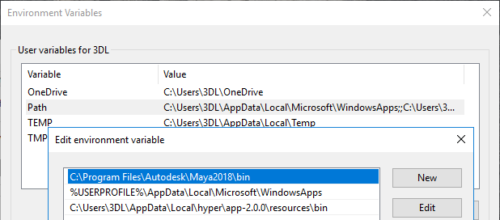
Add the path to your Maya binaries, as shown:
Now install the PIP package manager. Notice that Maya lives inside your Program Files, so installing anything in mayapy requires administrator’s privilege. You will need a command prompt running as admin. Then download the get-pip python script from this address: https://bootstrap.pypa.io/get-pip.py and run the following command from the folder where you have downloaded the script:
mayapy get-pip.py
Now you can easily install everything else you’ll need. First we will install Theano, the backend we’ll use for Keras. Theano depends on Numpy and Scypi. So download both these packages from the resources in this article and run the following commands:
mayapy -m pip install PATH/numpy-1.13.1+mkl-cp27-none-win_amd64.whl
mayapy -m pip install PATH/scipy-0.19.1-cp27-none-win_amd64.whl
Now you can install Theano straight from the web, as it is not binary incompatible with Maya itself.
mayapy -m pip install theano
Before installing Keras we need to install its dependency H5py, a wrapper for the HDF5 library. I have built an H5PY wheel that is binary compatible with Maya, you can download it from the resources. But I could not bundle all the DLLs with the wheel, so you will need to install the HDF5 library for the Python package to work. The compiled library HDF5 library is also available in the resources.
mayapy -m pip install PATH/h5py-2.8.0rc1.post0-cp27-cp27m-win_amd64.whl
And now install Keras from the web
mayapy -m pip install keras
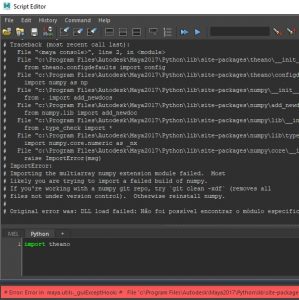
The first time you run Keras inside Maya (doing a ‘import keras’) you’ll get na error. That happens because Keras comes configured to run on Tensorflow and you do not have Tensorflow installed in mayapy. Keras will create a Json file in your Windows user directory (c:\users\yourName\.keras). Find that json file and substitute the word ‘tensorflow’ for the word ‘theano’.
A little gotcha. When you run mayapy.exe from a prompt your Python user directory is c:\users\yourName\, but when you run Python from within Maya itself the user directory is c:\users\yourName\documents. In that case, you will need to configure Keras backend again.
You are good to go.
When you run Keras again you’ll be warned about the fact that no compiler has been configured for your Theano installation. That means Theano will not run at full speed. But since we are not training our model inside Maya that will not be a real problem.
How to load your model classify new data
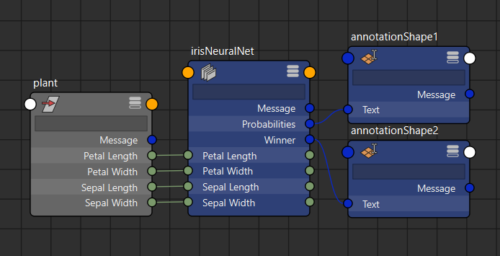
Now that you have Keras up and running you can use it to run your previously trained models. For this tutorial, I have prepared a sample scene for you.
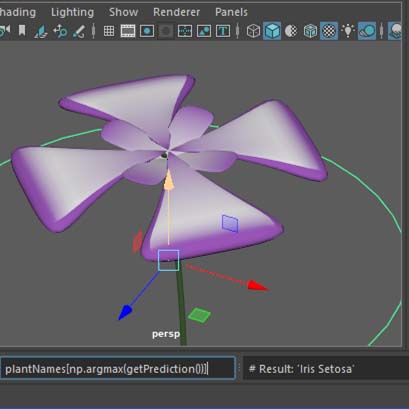
The sample scene constitutes a procedural flower, for which you can control the length and width of petals and sepals. And, you guessed it, we will then used those values to classify what type of plant you have created.
Loading your trained Neural Network inside Maya
To classify your flower you will need the following Python packages: Pymel core, to extract scene attributes; Numpy to create a NDArray you will feed the model; and Keras to load the actual model.
import pymel.core as pmc
import numpy as np
from keras.models import load_model
Loading the model can be done with a single line of code
model = load_model("PATH\\iris.h5")
You can then create a function to extract scene values and get a prediction from your model:
def getPlantClass():
  # Get plant attributes from scene objects
  sl = pmc.general.getAttr('plant.sepalLength')
  sw = pmc.general.getAttr('plant.sepalWidth')
  pl = pmc.general.getAttr('plant.petalLength')
  pw = pmc.general.getAttr('plant.petalWidth')

  # Get prediciton from model
  plantData = np.array([sl,sw,pl,pw])
  plantData = plantData.reshape((1,4))
  prediction = model.predict(plantData)
  return prediction
After the function is declared you can:
getPlantClass()
You will not get a pretty name for your plant but instead a “probability” (this is quotation marks for Neural Networks are not actually probabilistic models). For example, the previous image returned a 0.77 chance of being a Setosa, a 0.22 chance of being a Virginica, and 0.005 chance of being Versicolor. In order to get a more readable result you can get the ID of the highest probability using:
np.argmax(getPlantClass())
And you can then use a dictionary to convert those values to the actual class names, as exemplified in the resources and in the image below:
In Conclusion
We have classified scalar values into categories, using the knowledge that was implicit in a dataset. Think how many things in a 3D scene are composed of scalar values: vertex positions, particle positions, transform matrices, joint orientations, the color values in textures and renders, and so on. That means we’ve got a method to classify any of these assets into categories, provided we have a dataset with sufficient information for the task at hand.

Hi ,
First would like to thank you for this great article ,im struggling to get this working in maya . i did install h5py but its giving me the following error Error: ImportError: file C:\Program Files\Autodesk\Maya2018\Python\lib\site-packages\keras\engine\saving.py line 218: `load_model` requires h5py. #
Hey swapnil, thank you for checking out this blog and taking the time to follow through with the tutorial.
I’m not sure what may have happened. Two guess:
Tell me if this works for you.
Cheers!
Hello , tried to install h5py multiple times still stuck with the following
# Error: ImportError: file C:\Program Files\Autodesk\Maya2018\Python\lib\site-packages\h5py\__init__.py line 26: DLL load failed: The specified module could not be found. #
Thank you for the reply ,
Yes h5py is installed in mayapy.exe interpreter , i uninstalled it and installed again just to double check . when i import h5py getting this error
C:\Program Files\Autodesk\Maya2018\Python\lib\site-packages\h5py\__init__.py line 26: DLL load failed: The specified module could not be found. #
The only difference i could spot between numpy , scipy, keras and h5py is just h5py has “.pyd” file format files in the folder , rest have .py files
Ok, I’ve finally got this. You’ll need to install the HDF5 library for Windows. I was not able to reproduce this before because I was using the same computer where I had created the Python Wheel.
Please use HDF5 version 1.10.2, which is the one I have built against. Here is the link for it: https://www.hdfgroup.org/downloads/hdf5/
Please tell me if this works for you.
Cheers
Hi Gustavo, first of all thank you for the tutorials. Like swapnil, myself also got the same error when try to run ‘load_model(‘iris.h5′)’.
# File “C:\Program Files\Autodesk\Maya2018\Python\lib\site-packages\keras\engine\saving.py”, line 218, in load_model
# raise ImportError(‘`load_model` requires h5py.’)
# ImportError: `load_model` requires h5py. #
When I tried ‘import h5py’ in Maya, the error i got is as below:
# Error: DLL load failed: The specified module could not be found.
# Traceback (most recent call last):
# File “”, line 1, in
# File “C:\Program Files\Autodesk\Maya2018\Python\lib\site-packages\h5py\__init__.py”, line 26, in
# from . import _errors
# ImportError: DLL load failed: The specified module could not be found. #
I did install all the necessary modules through Admin privilege in the command prompt. ‘Successfully installed h5py-2.8.0rc1.post0 numpy-1.14.5 six-1.11.0’
Let me know if you have any clues, thank you!
Ok, I’ve finally got this. You’ll need to install the HDF5 library for Windows. I was not able to reproduce this before because I was using the same computer where I had created the Python Wheel.
Please use HDF5 version 1.10.2, which is the one I have built against. Here is the link for it: https://www.hdfgroup.org/downloads/hdf5/
Please tell me if this works for you.
Cheers
Hey sinnamon and swapnil, thanks for reporting this. I can reproduce this in a vanilla Maya installation. Sorry about that. I’m trying to address this issue. Also sorry for the delayed response. I was not being notified about new comments, but that is fixed.
Amazing !! Thanks a lot , Almost had lost hope on getting anywhere with hpy5 , had posted the issue in some forums but was not able to find h5py version working in Maya , and then i see your mail with the solution 🙂 . Works like charm now , was able to get the example file working . Thanks again
Very glad to hear that. Thanks once again 🙂
Hi, This is great tutorial!
I bumped into some issues when trying this with Maya 2017. Which version of Keras you are using? In your post, it says installed from web, I guess it will be the latest one? when I do “from keras.models import load_model”, it actually reports an import error that “C:\Program Files\Autodesk\Maya2017\Python\lib\site-packages\keras\utils\_init_.py line 2: cannot import name np_utils”. I checked keras installation and the np_utils.py is inside of the “utils” folder. I tried installing np_utils package, but it didn’t solve the issue. And also I was importing numpy before importing keras, which was suggested on internet could be the solution to this problem. Do you know of any way to solve this?
Thanks a lot!
Hello, Naiqi! I have the same problem with you that when I want to load model, there is an error “Error: ImportError: file C:\Program Files\Autodesk\Maya2018\Python\lib\site-packages\keras\utils\__init__.py line 2: cannot import name np_utils # “. And I have already installed np-utils package but it didn’t work… Have you solved this problem now?
Sorry to bother you and thanks a lot!
Hi, this is great tutorial! I still got the same issue as other user, although I have downloaded source of HDF5 1.10.2 and build it with CMake with Visual studio 2012, after that, it is installed under C:\Program Files\HDF_Group\HDF5\1.10.2 and I add this path into my system environment “path”, but it seems the python h5py module still can’t find this DLL. I was building HDF5 64bit, I wonder if it is related. Can you help? Thanks! Naiqi
Hey Naiqi, as we have talked through e-mail and resolved this privately I’ll publish the solution here so other people can benefit from the solution.
“You should install the PRE-COMPILED version of HDF5 provided by the HDF Group. You don’t need to compile anything yourself. Use their Windows VS2015 version that is available in this URL:
https://www.hdfgroup.org/package/windows-7-64-bit-vs2015-2/”
Other important things:
* Maya version must be 2018
* HDF version must be 1.10.2
* I have updated the URL in the post to always point to the correctly compiled version of HDF
Cheers, and thank you for reaching out.
Hey,
It seems that link is longer valid. Following that link now just sends you straight to the download page where the only binaries are for the latest version. And using these gives me the same issues as previously mentioned. I found a google cache of that link from Oct 4th, but this requires a log in, and I can’t do that on the cached site.
I’m horrible with compiling etc, so I’m not able to compile the version of HDF5 you had. Is it possible to get the installer from you if you still have it somewhere? Any hints would be great! I’m on Windows 10 using Maya 2018.
Thanks,
Mathias
Hey Mathias, thanks for letting me know. I have just checked that it is ok to distribute compiled binaries of HDF5, so, I’ll be e-mailing a link for all people in the list as soon as possible.
Very sorry for the inconveniences.
Cheers,
Gus
each time I try to download the HDF package it errors out, on multiple machines, for the past three days, with different browsers. I’ve tried versions on the support site. What’s the trick?
And just a note of things to try, For years I’ve generally left the default Maya python install as-is and install a matching one to the system. This link shows how to build, or better yet, has a link to download:
Python 2.7.10 (default, Aug 7 2015, 13:03:04) [MSC v.1900 64 bit (AMD64)]
http://www.p-nand-q.com/python/building-python-27-with-visual_studio.html
I then install all new modules to the system Python and them just pick up the paths in maya.
Anyway, help getting HDF working would be greatly appreciated.
Rockin’ tutorial by the way!
Hey Rick, thanks for contacting me. I’m getting the same errors here but I don’t know why that is. It did not use to be like this, I have previously downloaded and installed that build. I’ll try contacting them.
The suggestion on the interpreter installation is neat. Seems like this would make things cleaner. Thanks!
Thank you so much for writing this article and especially for the support for people running into problems! Had the h5py-issue as well and really appreciate that you didn’t write the post and then forgot about it 🙂
Looking forward to doing tests with this!
Thanks for the kind words Mischa. Eager to see what you’ll build with this 😀
Thanks for this great blog and I am trying to implement this code.
However, there’s always a problem when I try to import keras in Maya script, shown as “# Error: ImportError: file C:\Program Files\Autodesk\Maya2018\Python\lib\site-packages\keras\utils\__init__.py line 2: cannot import name np_utils # “. And I tried many solutions but it doesn’t work. The other Settings follow your tutorial.
Look forward to your kind reply!
Thanks a lot!
Hhi everyone, I don’t know if this post is still active but i need help.
I am trying to install h5py library inside Houdini and I have the same problem as .dll.
I would need the wheel compiled in biary with visual studio 2017.
I tried to replicate the tutorial step by step but I can’t generate it myself.
Can someone help me.
Thanks a lot.
Paolo
Thank you,
However How can I download resources? I shared post but I couldn’t see any download link